Are you planning to install a new garage door in your home? Don’t fret! With these Garage Door Tips and this ultimate guide, you’ll be able to master the art of garage door installation in no time.
Whether you’re a DIY enthusiast or simply want to save some money by doing it yourself, this guide will walk you through the entire process and help ensure that your new garage door is installed safely and correctly.
From selecting the right type of door for your needs to measuring and preparing the space for installation, this guide covers everything you need to know to get started.
You’ll also learn about the tools and materials necessary for the job, as well as step-by-step instructions for each stage of the installation process.
By following these tips and techniques, you can confidently tackle this project on your own and enjoy a beautiful new garage door that’s both functional and stylish.
So let’s get started!
Preparation And Safety Measures
Gather all the necessary materials before starting the installation, being aware of the need for personal safety when handling power tools and electrical wiring.
Always take precise measurements and assess the site for any potential hazards.
Be mindful of the weather conditions, and make sure to use the right lubricants, fasteners, anchors, and protective gear.
Finally, check any applicable permits and document the entire process.
Gathering Materials
Are you planning to install a garage door on your own? Before you start the installation process, it is important to gather all the necessary materials. This will ensure that you have everything you need before starting the installation process, saving you time and ensuring that the job is done correctly.
Start by checking the manufacturer’s instructions for a list of required materials. Typically, this list includes items such as screws, bolts, hinges, tracks, rollers, and weatherstripping. You will also need tools like a power drill with different bits, wrenches, pliers, levels and ladders.
If any materials are not included in the package or if you do not have them already at home make sure to purchase them beforehand. It is important to invest in high-quality materials as they will ensure durability and reliability of your garage door. Cheap or substandard supplies may save money upfront but can lead to frequent repairs or even accidents later on.
Therefore take your time to research and choose reputable stores to purchase your supplies from. With proper preparation and quality materials in hand, you are now ready to proceed with installing your garage door safely!
Personal Safety
Now that you have gathered all the necessary materials for your garage door installation, it is important to prioritize your personal safety. Garage door installation can be a hazardous task, and it is crucial to follow proper safety measures to avoid any accidents or injuries.
To begin with, ensure that you have read and understood the manufacturer’s installation instructions thoroughly. Use safety gear like gloves, safety glasses, and hard hats, as well as appropriate clothing to protect yourself from any harm.
In addition, make sure that your workspace is clear of any clutter, tools are organized properly and ladders or scaffolds are secure.
Moreover, it is highly recommended to have an assistant present while installing the garage door. This will not only ensure that the job is done efficiently but also provide an additional set of hands when needed.
Lastly, always remember to power off electrical sources before beginning work on the garage door opener or other electronic components.
By following these safety measures in conjunction with proper preparation and high-quality materials, you can install a garage door safely and effectively without compromising your well-being.
Required Tools And Supplies
You’ll need the right tools and supplies to install a garage door properly.
A hammer, screwdriver, socket wrench, drill, and pliers should be at the top of your list.
You’ll also need a level, tape measure, garage door panels, tracks, hinges, fasteners, cables, and springs.
It’s important to have these on hand before you start!
Tools
When it comes to installing a garage door, having the right tools is crucial. Without them, the entire process can become frustrating and time-consuming.
To start, you will need a power drill with various drill bits for different materials. A level will also be necessary to ensure that your garage door is properly balanced and aligned.
In addition to these basic tools, you will also need locking pliers or vice grips for holding bolts in place while tightening them. A socket set with ratchets and extensions will be helpful for working on nuts and bolts that are difficult to reach. Other essential items include a hammer, screwdrivers of varying sizes, and a tape measure.
Lastly, safety should always be a top priority when installing a garage door. Therefore, it is recommended that you wear heavy-duty gloves to protect your hands from sharp edges and pinch points. Eye protection is also important in case debris flies around during the installation process.
By having all of these tools at your disposal and taking proper precautions, you can master the art of garage door installation with ease!
Supplies
Now that we have discussed the required tools for installing a garage door, let’s move on to the necessary supplies.
One of the most important supplies you will need is lubricant. Applying lubricant to all moving parts of the garage door will ensure smooth operation and prevent rust over time.
You will also need weatherstripping to seal gaps around your garage door and prevent drafts from coming in. This is especially important if your garage is attached to your home or if you use it as a workspace.
Lastly, it’s essential to have replacement parts on hand in case something breaks or wears out over time. This includes items such as hinges, rollers, cables, and springs. By keeping these supplies handy, you can quickly make repairs without having to wait for new parts to arrive.
With the right tools and supplies at your disposal, installing a garage door can be a breeze!
Measuring Your Space
Let’s start by measuring the size of the door – that’ll give us the big picture.
Next, we’ll measure the width, height and depth of the door frame to make sure it’s the right fit.
After that, we’ll check the measurements against the door’s instructions to make sure they match up.
Finally, we’ll take into account the wall’s thickness to make sure the door fits snugly.
Measuring Door Size
Are you looking to install a new garage door in your home? One of the most important steps in this process is measuring the size of your door. Measuring accurately will ensure that your new garage door fits perfectly and operates smoothly, without any unwanted gaps or misalignments.
Before you begin, make sure to gather all the necessary tools, including a tape measure, level, and step ladder.
Start by measuring the width and height of your current garage door opening, taking note of any irregularities or obstructions that may affect the installation process. Keep in mind that it’s always better to round up slightly when measuring, as this will give you some wiggle room during installation.
Once you have your measurements, it’s time to choose the right size for your new garage door. Most residential doors come in standard sizes ranging from 8×7 feet garage doors to 16×7 feet. If your opening falls outside of these ranges, you may need a custom-sized door.
Remember: accurate measurements are key to ensuring a successful installation and long-lasting performance from your new garage door.
Measuring Door Frame
Now that you have measured the width and height of your garage door opening, it’s time to move on to measuring the door frame. This step is important as it will help you determine if your current frame is in good condition and if any repairs or replacements are needed before installing your new door.
Start by measuring the width and height of your door frame, taking note of any irregularities or damage that may affect the installation process. Make sure to measure from inside edge to inside edge, as this will give you an accurate measurement of the space available for your new door.
Next, measure the depth of your door frame, which refers to the distance between the front and back edges. This measurement is crucial as it will determine how much clearance you have for tracks and rollers during installation.
Remember: accurate measurements not only ensure a successful installation but also prevent any complications or safety hazards down the line. With these measurements in hand, you can confidently move forward with choosing and installing your new garage door.
Selecting The Right Garage Door Opener
There’re a few different types of garage door openers available, so it’s important to know which one is best for your needs.
Motor power ratings are also important when selecting a garage door opener; you want to make sure it’s powerful enough to lift your door.
We’ll go over all the different types, as well as the motor power ratings to help you make the right choice.
Let’s get started so you can master the art of garage door installation!
Types Of Garage Door Openers
When it comes to selecting the right garage door opener, one of the most crucial decisions is choosing the type of opener that best suits your needs.
There are three main types of garage door openers: chain-driven, belt-driven, and screw-driven.
Each type has its unique features and benefits.
Chain-driven openers are the most common and affordable type in the market.
They use a metal chain to operate, which tends to produce a bit more noise than other types.
Belt-driven openers, on the other hand, use a rubber belt to operate and are much quieter than chain-driven ones.
They are slightly more expensive but worth the investment if you’re looking for minimal noise levels.
Screw-driven openers use a threaded steel rod to operate and are known for their reliability and low maintenance requirements.
Choosing the right garage door opener depends on your specific needs, preferences, budget, and garage door size/type.
Whether you opt for a chain-driven, belt-driven, or screw-driven opener will largely depend on how much noise you can tolerate and how much maintenance you’re willing to do.
Consider consulting with a professional garage door installer who can help you make an informed decision based on your unique situation.
Motor Power Ratings
Now that we’ve covered the different types of garage door openers, let’s take a closer look at motor power ratings.
The motor is the heart of the opener, and its power rating determines how quickly and smoothly your garage door will operate. Motor power is measured in horsepower (HP), with most residential openers ranging from 1/2 to 1 1/2 HP.
Choosing the right motor power largely depends on the size and weight of your garage door. A standard single-car garage door typically requires a 1/2 or 3/4 HP motor, while a larger double-car door may require a more powerful 1-1/2 HP motor.
Keep in mind that if you have an insulated or heavy wooden garage door, you may need to opt for a higher horsepower motor to ensure smooth operation.
It’s also essential to consider how often you’ll be using your garage door. If you use it frequently throughout the day, such as running a home business or have several family members using it regularly, investing in a higher horsepower motor can improve its longevity and performance.
On the other hand, if you only use your garage occasionally, then choosing a lower horsepower motor might suffice.
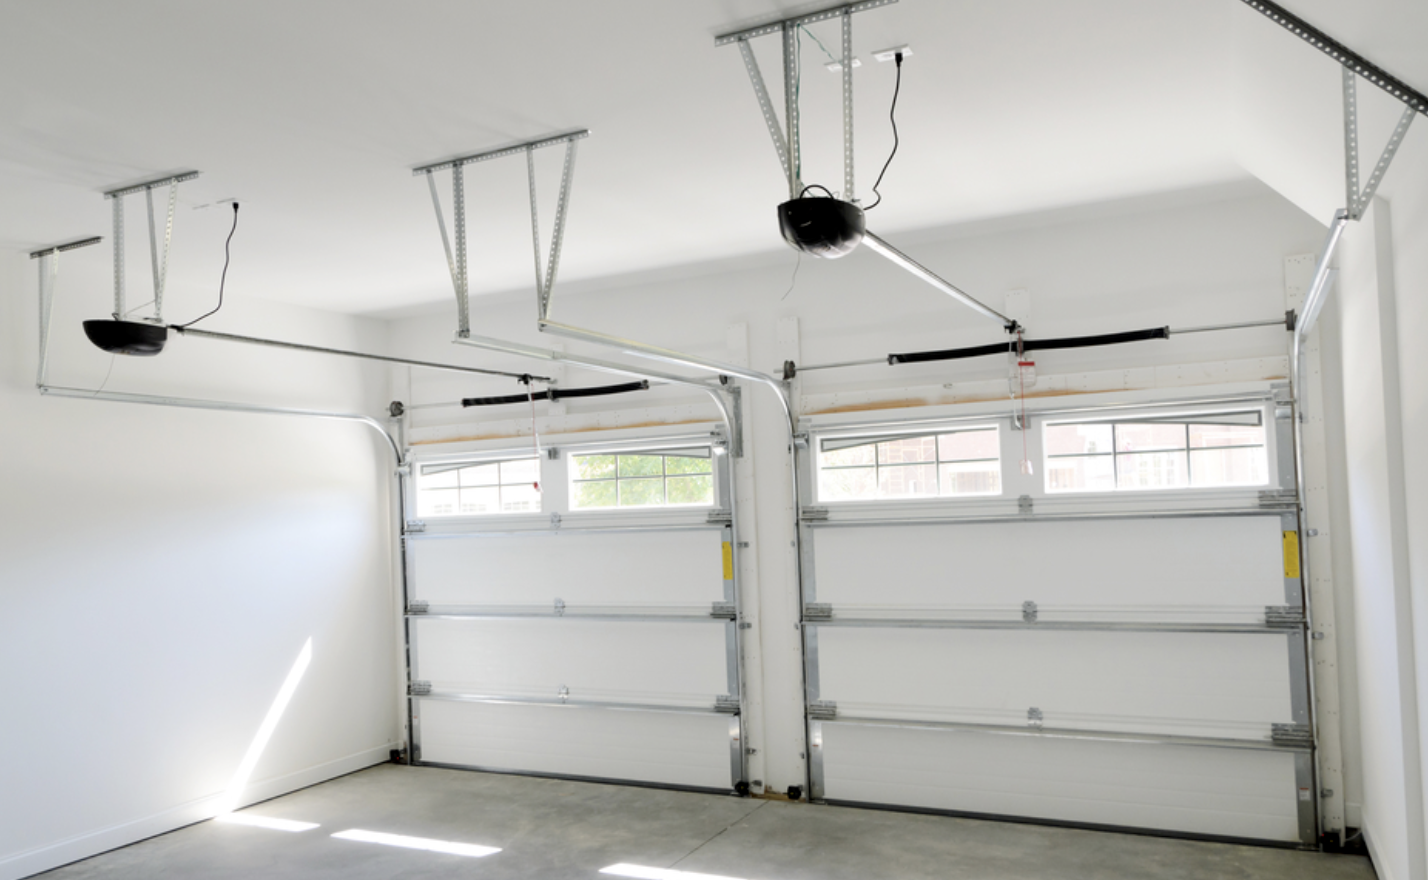
Understanding The Components Of A Garage Door
There are different types of garage door components, such as openers, tracks, rollers, and springs.
It’s important to be able to identify each component so you can properly install your garage door.
You’ll want to know what kind of opener you’re using, what type of tracks, and what type of rollers and springs are in place.
That way, you can master the art of garage door installation.
Types Of Garage Door Components
When it comes to garage door installation, understanding the components of a garage door is crucial. One important aspect to consider is the different types of garage door components.
The first component to look at is the garage door itself, which can vary in material from wood to steel and come in various styles such as traditional or modern.
The second type of component to consider are the springs that help lift and lower the garage door. These can be either torsion or extension springs, with torsion springs being more common due to their durability and ability to handle heavier doors. It’s important to note that attempting to replace these springs yourself can be dangerous and should be left to professionals.
Lastly, the garage door opener is another essential component that needs attention during installation. This device controls the opening and closing of the garage door using a motorized mechanism. Belt-drive, chain-drive, and screw-drive are three types of openers available with varying noise levels and price ranges. Choosing the right opener for your garage door will depend on factors like weight, size, and usage frequency.
Understanding each type of garage door component is necessary for proper installation and maintenance. From choosing the right type of material for your garage door to selecting a reliable opener, every aspect must be considered carefully before proceeding with installation.
By mastering these skills, you’ll be able to safely install a functional and long-lasting garage door for your home or business.
Identifying Garage Door Components
Now that we have discussed the different types of garage door components, it’s important to identify these components as part of understanding how they work together.
One crucial aspect of identifying garage door components is knowing what type of springs your garage door has. As mentioned earlier, these springs come in two varieties: torsion and extension springs. Knowing which type of spring your garage door uses is essential for proper maintenance and replacement.
Another component to identify is the cables that hold the weight of the garage door while it opens and closes. These cables are attached to the bottom brackets on either side of the door and run up through the springs. It’s important to check these cables regularly for signs of wear or fraying, as failing to do so can lead to safety hazards.
Lastly, identifying the rollers on which the garage door moves is another critical component to consider. These rollers are typically made from steel or nylon and require lubrication to operate smoothly. Identifying worn-out or damaged rollers can help prevent issues with your garage door’s movement and prolong its lifespan.
By being able to identify each component of a garage door, you’ll be better equipped to maintain and repair any issues that may arise. From checking springs and cables for wear and tear to lubricating rollers, proper identification can help ensure a safe and efficient functioning garage door.
Installing The Frame And Tracks
I’ll start by measuring the opening for the garage door, so that I know what size frame to get.
Next, I’ll attach the tracks to the frame, making sure they’re level.
Then, I’ll attach the tracks to the wall of the garage.
Lastly, I’ll attach the vertical tracks to the door itself.
Measuring The Opening
You’re ready to start installing the frame and tracks of your garage door.
The first step is measuring the opening where the door will be installed. This is a crucial step that must be done with precision to ensure that the door fits perfectly.
To measure the opening, you’ll need a tape measure and a level.
Start by measuring the width of the opening at the top, middle, and bottom. Write down each measurement and use the smallest one as your guide.
Next, measure the height of the opening at both sides and in the middle. Again, write down each measurement and use the smallest one as your guide.
Once you have your measurements, check to make sure that they are level and plumb. If they’re not, you may need to make adjustments before proceeding with installation.
With accurate measurements in hand, you can move on to installing the frame and tracks for your new garage door with confidence.
Attaching The Tracks
Now that you’ve measured the opening for your garage door, it’s time to move on to attaching the tracks. These tracks will guide the door as it opens and closes, so they must be installed correctly for smooth operation.
First, attach the vertical track to the jamb using lag screws. Make sure that the track is plumb and level before tightening the screws. Repeat this process on the other side of the opening, being careful to keep each track at the same height.
Next, install the horizontal track across the top of the opening. Again, use lag screws to secure it in place and make sure that it is level.
Finally, connect the horizontal track to each vertical track with brackets and bolts.
By following these steps carefully and ensuring that each component is level and plumb, you can ensure a smooth installation of your garage door tracks. With this important step complete, you’re one step closer to enjoying a fully functional garage door system in your home or business.
Finishing Touches And Final Testing
We need to make sure the opener is securely attached. That way, it won’t come loose over time.
Once it’s attached, we can adjust the travel limits, so the door knows when to stop and reverse.
After that, it’s time to test the sensors. Make sure they’re in good working order, so they’ll detect any obstructions.
We don’t want anyone getting injured due to a malfunction.
Alright, let’s get to it!
Securely Attaching The Opener
You’ve put in so much effort into installing your garage door, and it’s almost time to enjoy the fruits of your labor. But wait, have you securely attached the opener yet? This is a crucial step that cannot be overlooked if you want your garage door to function properly and safely.
To attach the opener securely, start by carefully reading the manufacturer’s instructions. Make sure you have all the necessary tools before starting.
Then, position the opener on the ceiling above the center of the garage door and use a ladder to reach it. Securely fasten it using bolts and anchors provided with the opener kit.
Once you’ve attached the opener, test its functionality by opening and closing the garage door multiple times. Observe if there are any jerky movements or unusual sounds. If everything seems fine, then congratulations!
You have successfully installed a garage door opener. With these final touches complete, you can now sit back and enjoy your brand new garage door knowing that it was installed with care and precision.
Adjusting The Travel Limits
Now that you have attached the opener, it’s time to move on to another essential step in finishing touches and final testing.
Adjusting your garage door’s travel limits is crucial to ensure its smooth and safe operation. Travel limits control how far your garage door opens or closes, preventing it from hitting the ground or ceiling.
To adjust the travel limits, locate the limit adjustment screws on the opener unit. You will need a ladder to access them. Use a screwdriver to turn the screws clockwise or counterclockwise until you achieve the desired open and close positions.
After adjusting the travel limits, test your garage door by opening and closing it several times using both the wall switch and remote control. Observe if there are any irregular movements or sounds.
If everything seems fine, then you’re all set! Your garage door is now fully installed, adjusted, and ready for use.
Testing The Sensors
Now that you have adjusted your garage door’s travel limits, it’s time to move on to the next important step in finishing touches and final testing.
Testing the sensors is crucial to ensure that your garage door operates safely and smoothly.
To test the sensors, activate the garage door opener and place an object in its path.
The door should stop moving immediately upon detecting the object.
If it does not stop or reverses when it shouldn’t, then there might be something wrong with the sensors.
If you encounter any issues during testing, consult your owner’s manual or contact a professional technician for assistance.
It’s essential to make sure all safety features are working correctly before using your garage door regularly.
Conclusion
In conclusion, understanding “Garage Doors Basics” is essential to mastering the art of garage door installation. With the right preparation, safety measures, tools and supplies, understanding of components, and selecting the right garage door opener, anybody can install a garage door with ease.
By following the step-by-step guide outlined above, you can ensure that your garage door installation is a success.
Remember to take time measuring your space and installing the frame and tracks correctly to avoid future issues.
With some patience and attention to detail, you can enjoy the benefits of a functional and aesthetically pleasing garage door for years to come.